Although it has been 2 months after I completed the dress, I'm finally posting on the construction details of my Trina Turk Knock-Off. My computer is still dead but the Geek Squad successfully retrieved all my data including the pictures for this post :-) So here it goes!
I'm a fan of Trina Turk dresses. I consider them to be statement dresses yet the details are very simple. Even the advertisements are simple;it doesn't take much work to sell her dress...well....except when it comes to the price....
This simple black and white color blocked number was sitting on my inspiration wall for a few weeks when the RTW contest was announced. I promised myself I was going to remake it so contest gave me that extra little nudge to get it done :-)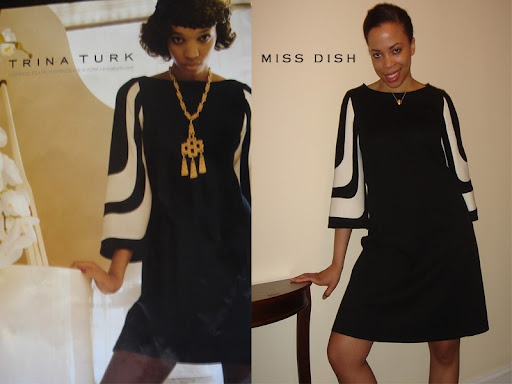
I purchased McCall M5583 during a $2.99 sale...the pictures on the envelope are truly uninspiring but I more so concerned with the silhouette - A-line shift dress with belled sleeves. (I love McCall's but sometimes you really need to block out their fabric choices to avoid discriminating against an otherwise cute pattern.) I used view C, pictured below as a retro black sheer dress.
My first step after cutting the pattern was to figure out these sleeves. In fact...I finished the sleeves before I even cut the dress fabric. My high school dean used to say K.I.S.S. (Keep It Simple Stupid) and it has been my sewing mantra ever since this dress. If a solution seemed to complicated then I was probably going about it the wrong way. So I'll spare you the methods that didn't work and share what did.
I took the sleeve pattern, as is, and transfered it onto a fresh piece of pattern paper and cut a replica. I marked a line down the center of the sleeve to ensure the design was symmetrical and marked a seam allowance to adjoin the inner sleeve (more on that later). I studied the dress a little and noticed the black stripes where about 1/3 the size of the white stripes. I chose to go with 1.25" black and 2.25" white strips because I thought it would look better with my proportions since I'm not a 5'11 like the girl in the ad. the vertical lines tapered into 1.25" to the sleeve cap. When it was time to draw the curves I left no room for error...I went straight to my cupboard and whipped a can of tomato puree. I matched the edges of the can with my line and traced the curves. I started to get lazy so instead of repeating on the other side I just used tracing paper to mark the rest of the curves. The sleeve pieces were ready to cut! But before I did that I had to dummy-proof each section my marking "1 0f 5 - black".."2 of 5 white"...etc. With a fresh piece of pattern paper I transferred the sleeve pieces and added the traditional 5/8" seam allowance. I then proceeded to cut the fabric. Since this was a warm weather dress I decided to go with black and white double knit. However, the white fabric was flimsy in comparison to the black so I backed it with knit fusible interfacing and omitted the allowances.
Sewing inverted curves takes a little be of getting used to. Attempted to follow the directions in my books but I opted out. I sniped notches in the seam allowance BEFORE sewing the curves together instead of after like the books suggested. I just had to make sure i didn't snip past the allowance. Now ,I used white thread...but I couldn't help but think I should have used black bobbin thread.
 Press-y Press-y!
Several inverted curves later and I had two sleeves! I sewed the front and back peices of the dress together. However, I omitted the zipper since I didn't use a woven as the pattern suggested. I also took off 5" from each side seam hem and tapered int to the waist...just to make it a little more flattering...you know.
Then it was time for the neck facing. Now the pattern sugessted that I make bias tape for my neck facing...but it just wouldn't work for this dress. I did not intended on exposing any stiching on the dress so topstiching was a no-no. I cut neckline facing by useing the dress pattern as a guide and fused a black knit interfacing. Then I stay-stitched the facing to allowance and pressed.

You can't tell from the picture, but I assumed Trina Turk (or her intern) would have have done either 2 things with the inside of the sleeve. Either face it entirely with one color or mimic the outside pattern in the inside. I went with former and it was as simple as cutting another set of sleeve and sewing to the hems of the outer sleeve. Again, I stay-stitched the inner sleeve to the allowance and pressed.

At the very top of the sleeves I trimmed the allowance and used my overcasting foot to sewing the inner sleeve to the armscyes seam allowance. (Having a serger would have come in handy!)
If you look closely you can aslo see the stay tape I used in the shoulder seam.

So this is what it looks like when I raise my arms :0)

That's my dress construction!! It was fun challenge that helped me shake my fear of sewing inverted curves....standing collars here I come!!!
I do have 2 other completed project I'm working on ... please bare with me as I blog at the speed of tree sap. I did, however get a Palm Centro with the Sprint unlimited EVERYTHING plan. I'm in love...really. I actually check my Google Reader religiously which has turned me into a lurker. But do trust, I am keeping up with you Fab Blogistas ...which reminds me...my blog roll is way over due for an update!
Just answering some questions
From Arline:
1. Re: the lining of the sleeve - do I understand that the entire sleeve lining is indeed sewn onto the inside of the outer sleeve and stitched at all junctures - in other words, the side seam of the sleeve, the hem of course and around the entire armscye? So first, while it's flat, the completed sleeve and lining would be sewn across the hem of the sleeve right sides together and then turned right sides out and THEN sides seams stitched together and then that is then stitched to the armscye? So, around the armscye there are actually 3 layers in the seam: one from the outer sleeve, one from the inner sleeve lining and the third layer from the armscye of the dress? Just want to make sure my mental pic is on track here!
I thought about that approach (Sew Hem then Side Seam) first but I realized that after the hem was sewn I had to sew the lining side seam and the outer sleeve in one long stitch. It would have been quicker but there would be a problem. I wanted the inner sleeve *slightly* smaller (about 1/16") than the outer so that it doesn't cause bunching on the inside. The best way for me to ensure both outer and inner sleeves measured properly was for me to sew the side seams separately then the hems together...I'm anal....I know...... :-(
As for the Armscye, there are 3 layers but only 2 were to sewn together at a time to reduce the bulk. Here is the order: 1. Sew outer sleeve to the dress. Press seam allowances *open*. Trim and overcast outer sleeves seam allowance. 2. Trim the seam allowance of the inner sleeve (by however much its turned up at the hem ) Then sew the inner sleeve to the dress seam allowance. Trim and overcast or use a serger if you are fancy.
The sleeve was well balanced this way.
2. You said: I chose to go with 1.25" black and 2.25" white strips because I thought it would look better with my proportions since I'm not a 5'11 like the girl in the ad. the vertical lines tapered into 1.25" to the sleeve cap. So, the WHITE stripes were much wider at the bottom part and then you started tapering them in as you got closer to the top of the sleeve cap, correct? You didn't have to taper the black stripes at all since they were already only 1.25" wide, correct? You only tapered the vertical lines in the white stripes, yes? Trying to picture and grasp this in my little brain ...
You nailed it!
From Cidell:
Can you tell us about the paper you're using for tracing?
The paper pictured is actually not the tracing paper. It a 10 yd roll of pattern paper ($3 at Mood) with 1" gridline. However, I will be on the look out for tracing paper with a grid....


20 comments :
You put a lot of work into that dress!!!! It is fabulous girl!!!!
Ah yes I remember that fabulous dress - voted for it even. Thanks so much for sharing the details of your construction process.
Wow! awesome details!!! Thanks for the explanations.
You put a lot of work in it and it showed! That dress killed everybody with a knockout punch!
And this is why you won!
Can you tell us about the paper you're using for tracing?
Thank you for sharing how you made that FABULOUS DRESS!!
Those curved seams require *a lot* of patience - I'm impressed! What a fabulous dress.
I love this dress!! Absolutely adorable! (Love your blog colors too!)
I was so curious on how you were able to mimick those sleeves. Thanks for sharing. Your attention to detail really paid off because that dress is WOW.
The inside sleeve idea is an excellent touch. Very clean. Great work, sissy!
fantastic job, particularly on the finishing and attention to detail. Me? I would have just spent all day making sure I kept my arms down so no one could see inside LOL
Great "behind the seams" story. Very interesting techiques you use. I love that dress and that why I voted for you on PR.
Work it... work it... Looks fabulous! And those sleeves took both brain power and patience to create. I'm impressed!
You did a phenomenal job on that dress. The designer took a simple design and create a beautiful dress. What an inspiration. Thank you for sharing the details. Job well done
You've been tagged!
AMAZING, I'm speechless! BEAUTIFUL!
I think I've already said this, but those sleeves are the BUSINESS! Just flawless. You did a superb job and definitely deserved to win the PR contest.
Great Job!
Your hard work paid off!
Ok yes I recall that impressive dress - voted in favor of it even. Much appreciated such a great amount for sharing the subtle elements of your development procedure. You made an amazing showing with regards to on that exclusive dress. The planner took a basic outline and make an excellent dress
Much obliged to you for sharing how you made that fabulous dress!!
Post a Comment